Thursday, September 22, 2011

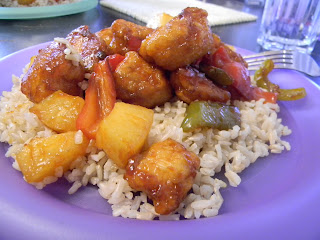
Sweet & Sour Chicken

I've been craving chinese for a little while now. The other night, I found an orange chicken recipe that looked amazing and was super easy. Unfortunately, after I cooked it, it turned out to be disgusting. (No, really...even my husband threw away his plate of food and he likes EVERYTHING). Yeah...epic failure.

So, to redeem myself, I decided to try chinese again, this time doing sweet and sour chicken. 

SUCCESS!!

It was really, really good. I was pleased with the way it turned out and will definitely be doing this meal again.

Sweet & Sour Chicken

PREP TIME/COOK TIME: 30 minutes - 1 hour
SERVING SIZE: Two

INGREDIENTS:
2 chicken breasts, cut into squares
1 egg
2/3 cups flour
1/4 cup water
1 tsp salt
1 1/2 tsp baking powder
Sweet & Sour Sauce (store bought/homemade)
1 green pepper
1 red pepper
pineapple chunks
Vegetable Oil
Reccommended: Rice

*NOTE: I used a store-bought sweet and sour sauce for this recipe. I know, boring, but with my last disastrous Chinese meal mishap, I decided to go store bought instead of homemade. Eventually, I'll find a really good sauce, but for now I really liked "Kikkoman Sweet & Sour Sauce" (pictured below). I thought it was really tasty. You'll find it where the soy sauce and teryaki sauce is in the super market.


Onto the RECIPE!!


1. Pre-heat a fryer or skillet-pan with oil in it for frying to 350 degrees. I use vegetable oil, because it is the cheapest.
2. Mix together the egg, flour, water, salt, and baking powder. The consistency will be pretty thick.


3. Take the chicken that you've already cut into squares and dip it into the batter. Make sure that the chicken piece is completely covered in the batter. The batter won't stick to the chicken that well at first.
4. Put the chicken into the oil and fry on both sides until golden brown.


5. When the chicken is golden brown, put on a paper towel to let the oil drain off.


MEANWHILE

6. As your chicken is frying, cut up your bell peppers and let saute in a frying pan.
7. Add a little bit of sauce and a little bit of water and mix the peppers around.
8. Throw in about a handful of pineapple chunks (I poured in a splash of the pineapple juice, just for good measure)
9. Add the chicken into the frying pan, along with some more sauce and a little bit more water. In the end, I used up about half of my bottle of the sweet and sour sauce and in between 1/8 and 1/4 cup of water.


10. Let simmer in the sauce until the peppers are soft, the pineapples are warm, and the sauce is heated through.
11. Serve with rice and enjoy!


My husband and I both loved this meal, and I have a feeling I'm going to be craving it often. The thing I love the most about it is the chicken. This breading is probably my favorite breading on chicken EVER! I felt like it was so authentic. If you don't like sweet and sour sauce, I recommend trying to find another sauce you like better, like orange (if you can actually find a good one...if you're looking at one from Pinterest, I would NOT recommend it) or lemon. Try out some different things and see what you like the best!

Hope you all enjoy!

-Chef Lyndsie

Wednesday, September 7, 2011

Crepes

It was only just recently, that my husband introduced me to a thing called "Crepe Salee" (which in French, means a Salted Crepe). Instead of putting chocolate, nutella, strawberries, etc. into your crepe, you put eggs, ham, and cheese! It's delicious (especially when you eat both at one meal)!

I thought that making crepes would be difficult. But to my pleasant surprise, they're extremely easy! And all of the ingredients were things that I had lying around my house! I wanted to share this recipe with all of you so you can start making delicious crepes as well!

Crepes

PREP TIME: 7-10 minutes
COOKING TIME: 15-20 minutes
SERVING SIZE: These crepes filled up both my husband and I for one dinner. I can't quite remember how many exactly it made though. But, I'm going to say the serving size is TWO.

INGREDIENTS:
1 cup of all-purpose flour
2 eggs
1/2 cup of milk
1/2 cup of water
1/4 tsp salt
2 tbsp butter, melted
Oil for cooking (PAM spray works okay)

1. In a large mixing bowl, whisk together flour and eggs. (If you don't have a whisk, like me, I used a fork and it seemed to work just fine.)
2. GRADUALLY add in milk and water, mixing into the flour/egg mixture.
3. Add the Salt and Butter. Mix until smooth.

*NOTE: If you've never made crepes before and you're not sure, you want your batter to be really runny. That's how it is supposed to be.

4. Heat a lightly oiled griddle or frying pan over medium high heat. Pour approximately 1/4 cup of the batter onto the frying pan.

*NOTE: The trick here is to swirl around the batter into a circular motion until it covers the entire frying pan. I personally used a small frying pan, but any size will work really. The bigger of a frying pan, the more batter you'll probably want to use. A small frying pan is best. Anyway, just swirl the pan in a circular motion until the batter covers the entire bottom and looks even all over.

5. Cook the crepe for approximately 2 minutes, or until the bottom is light brown. Loosen with a spatula, flip over, and cook the other side.
6. Repeat for steps 5 and 6 for each crepe, remembering to re-oil the surface every time. 
7. Serve with various toppings.
FOR CREPE SALEE (Salted Crepes): serve with eggs, ham, and cheese
FOR DESSERT CREPES: Serve with chocolate, nutella, strawberries, powdered sugar, etc. (pick your favorites and add that!)


***NOTE: My internet is deciding that it wants to be sketchy right now and will not upload my awesome pictures. So, as soon as it starts working up, I will edit the post to include pictures. If you really want to see a picture of what a crepe looks like, I would advise you to go to Google Images and type in "Crepes"***

Well, this is my recipe for the week! It's quick, easy, and super delicious! It's definitely become one of the family favorites. (And I must admit, I feel just a little bit more cultured every time I eat them). I personally like to have both the Salted AND the Dessert Crepes. But, I'm sure that there's a ton of different things you can add in other than eggs or strawberries. So, get creative and see what you can come up with! If you find anything good...leave a comment or send me and e-mail at lyndsielouwalker@gmail.com!

Well, that's it. Hope you all enjoy! 

-Chef Lyndsie

Saturday, August 27, 2011

Homemade Pizza Sauce

Well, I'm back. And I have a bunch of new recipes to add. To celebrate my return to the kitchen, I'm starting off with a super easy recipe that takes only a few minutes, costs around $2.00 (depending on how many spices you get), and is yummy! Yes, it's Pizza Sauce.

Okay, here's the deal with Pizza/Spaghetti Sauce. They're practically the same thing in my book. (Actually many days, they ARE the same thing). Usually, the only difference would be what spices I add.So, here's the recipe:

Homemade Pizza/Spaghetti Sauce


PREP TIME: 1 Minute (If that)
COOKING TIME: 6-8 Minutes
SERVING SIZE: Enough for One Pizza or A Couple Plates of Spaghetti

INGREDIENTS:
1 Can of Tomato Paste (6 oz)
1 Can of Tomato Sauce (8 oz)
Italian Seasoning
Other Various Spices (Optional)

*NOTE: "Other Various Spices" can include the following:
Garlic Powder
Salt
Pepper
Chili Powder
Basil
Oregano
Thyme
etc.

**NOTE II: Italian Seasoning includes Basil, Oregano, etc, but sometimes it's nice to add a little bit extra.

1) Open the can of Tomato Paste and pour it into a pan.
2) Open the can of Tomato Sauce and pour that into the same pan.
3) Add seasonings to taste

***NOTE III: It's important here to not be afraid of the seasonings. Just keep adding them until it tastes good. I usually start off with adding a lot of Italian Seasoning, Salt, Pepper, and Garlic Powder. Then, I continue adding different things until it tastes good to me. All of our taste buds are different, so I won't tell you how much is "too much" or "too little". Just have fun with it.

4) Cover and put on Medium to High Heat for about 6-8 minutes (or until heated through).
5) Enjoy. :)

Delicious!
This is a really easy recipe that tastes really good. For a thinner spaghetti sauce, add TWO cans of tomato sauce to every ONE can of tomato paste. And that's it! Bon appetit!

--Chef Lyndsie

Saturday, September 25, 2010

Pepperoni Sticks


Alright, here's the first of many recipes! I really like this one, because it's fun and uses hardly any ingredients! My husband and I usually double the recipe and have some left over.


*NOTE: I make most of my breads from scratch, I'm sure you can buy something from the store and use that instead, but I personally think that scratch tastes better. It's easy, and most of these ingredients are "staples" in my kitchen anyway...so here it is:

Pepperoni Sticks


PREP TIME: approx. 30-35 minutes
BAKE TIME: 14-18 minutes
MAKES 10-12 Pepperoni Sticks
SERVE WITH Marinara Sauce (Pizza Sauce) or Ranch

INGREDIENTS:
1 1/4 cups of flour
2 tsp sugar
1 1/2 tsp baking powder
1/2 tsp salt
2/3 cup milk
3 tbsp butter
shredded cheese
pepperoni

1) Combine flour, sugar, baking powder, and salt in a bowl.
2) Gradually add milk. Mix well and knead in bowl 4-5 times.
*NOTE: I rarely use all 2/3rds cups of milk, so be careful not to add too much in. But, if it happens to be sticky (which it usually ends up being for me) don't be afraid to use flour!! I always keep extra flour (about 1/4 cups worth) next to me as I roll these out. 

3) Separate into smaller balls. Sprinkle with flour so that it is easier to roll out. (You can get anywhere in between 10-12 balls)


4) Use your rolling pin and roll out the dough into a rectangular shape.


5) Sprinkle cheese onto the dough in the center and place three pepperoni on top of that. (If you like cheese, feel free to add more)


6) Fold over one side of the dough onto the pepperoni. Continue rolling until it is shaped as a stick. Press down to prevent it from re-opening.


7) Melt the butter in the microwave. Put 2 tbsp of butter into a 9x13 pan. Place the pepperoni sticks on top of the butter. Using a spoon, put the remaining tbsp over the pepperoni sticks, spreading it evenly on top.
8) Bake in the oven at 450degrees for 14-18. Until they are golden brown on top.


Here's the finished product! They're really good and fun to eat. Enjoy!
--Chef Lyndsie


**If you have a recipe you'd like to share or have a comment about the recipe above, feel free to leave a comment below or to contact Chef Lyndsie at cheflyndsie@gmail.com.